
My Christmas wreath made me so happy, every time I walked in the door I smiled. I wanted to do something for Valentine's Day too. Trouble was, we got snowed/iced in for a week and I couldn't get to the store to buy supplies for a new wreath. Soooo... what is a girl to do? Reduce, reuse, and recycle of course! Everything that I used here was something I had on hand and you probably do too!
I know Valentine's Day is past, but I made this wreath and took all these pictures and figured I'd post them anyway. And the best part about this wreath (
to me, anyway) is that it can be used for
more than one holiday. I don't know about you, but I don't have room to store a different wreath for every season/holiday. This one is whimsical and happy, very cutesy, but that's what Valentine's Day is all about, right?
What you'll need if you want to do it my way:
- A pair of old pantyhose
- A bunch of plastic bags from the grocery store
- A piece of cardboard, as big as you want your wreath to be
- Yarn
- Felt
- Glue gun and glue sticks
- Bobby pins
- Ribbon, for hanging (if desired)
This is a great project for anyone! So simple and fast! Since I was just shooting from the hip, there are things I would have done differently. I'll add those in italic.
Step 1: Stuff your pantyhose with wadded up plastic bags. I ended up using both legs of my pantyhose so that the size was more uniform. I tried to stuff them in tight enough that it was solid, but not so tight that I couldn't move it a bit. Just keep stuffing them in until you get it the size you want. Tie off the ends. I think it would have been more uniform if I had used both legs to the same length, rather than one longer than the other.
 Step 2
: Cut a circle out of your cardboard about 1 1/2" wide the diameter of your desired wreath. I used a sturdy pair of kitchen shears, but whatever you feel comfortable with will be great. I even had a cut in my circle to get to the inner circle. Once its all wrapped up, it doesn't matter at all.
I would have definitely used a guide for this, I just used my stuffed pantyhose as my guide, but a big bowl would have been better!
 Step 3:
 Hot glue your stuffed pantyhose to the cardboard.
 Step 4:
 Start wrapping your yarn around your wreath form. It might take a while. I did it in about 6-8 inch increments, not filling it all in the first time around. As I went around the entire wreath, I would go over the other areas surrounding it. Wrap and wrap and wrap. I found it to be helpful to make a ball of yarn, hold the wreath upright between my legs and pass the ball of yarn over and around the wreath over and over, then rotate to the next section. I kept going, overlapping in a fun layered way until I ended up with:
 Step 5:
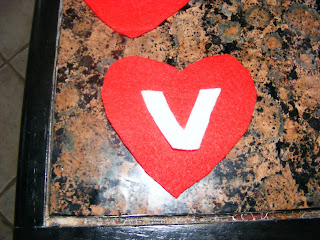
 Make your embellishments. I just cut out some hearts and letters with my felt. I layered two shapes together with hot glue. I attached the letters with hot glue as well. You could sew these to make them uber cute, but hot glue was fast and easy!
 Step 6:
 Now this is the part I'm really proud of. I was just going to glue the hearts to the wreath, but again thought about the hassle of having too many wreaths and this is what I came up with.... put the embellishments on bobby pins with a small dab of hot glue! That way they can be removed and I make others for spring and Easter! Perfect! I
'm not sure if it would be better, but placing the bobby pin further up on the embellishment might make it better. I think doing some of your embellishments this way, at least, would be nice. I do like having some of them stand up into the center of the wreath.
 Step 7:
 Arrange your embellishments on your wreath. What's that you don't like the way it looks? Go ahead and try again! Its so forgiving, you can just keep moving, adding, subtracting, etc. until you get it right! Tie a ribbon and hang it on your door! So fun!

This doesn't have to be a RRR project either, you could definitely just head to the craft store for a foam wreath form and just wrap it up in yarn. I'm excited to decorate it in flowers for spring (yep, its spring already in Texas 80 degrees! Wahoo!)!


