Thursday, October 4, 2012

Scraps... and an attempt at free motion quilting

When I made quilt #2 for QFK I had some pieces left over from my strips.  I decided to sew them up with some heat resistant batting to make some artistic hot pads.  I have to admit, every time I see them out on my counter top I love it!


Now, don't get me wrong, I know they are FAR from perfect... but the colors and the movement fit me so well I don't mind the imperfections.

I thought that the project would be a good way to try out free motion quilting... it didn't go so well. :(  But I will try again at some point. I'm sure there is a way of doing it successfully on my machine, this just wasn't it.

So for hot pad numero dos I just stuck with a simple X. Easy peasy.  I think I'm getting better at doing binding too so hooray for that!  Its amazing what a little practice can do!

Monday, October 1, 2012

Quilts for Kids #2

When I heard about the charity Quilts for Kids I knew it was something I should participate in.  They sent me a kit for my first quilt and then I used my own stash for this baby.

My inspiration can be found here.  But rather than using squares, I used jelly roll strips.  It is a very simple pattern, but it has such a big impact!  I love the way it turned out.  In order to get it to the size necessary to donate, I added borders and I think they tie it together really well.

Unfortunately I didn't get a picture of the quilt bound and quilted... but this shot of the top from my phone is enough to bring a smile to my face.


This is a super easy way to introduce someone (or yourself) to quilting!  There is something so great about creating a little thing of beauty that you know someone is going to love and cherish.  And the fact that it might help some little person through a difficult time is more than enough payment for me!

Sunday, September 30, 2012

Quilts for Kids #1

Have you heard about this great charity, Quilts for Kids?  It is such a neat program.  I heard about it and went to find out more! I was lucky enough to find a local chapter and they sent me a kit to make my first quilt.

It is a simple four patch pattern, with borders and quilted on the diagonal.  After I quilted it and bound it I wasn't so sure I loved it, but after washing and drying I was in love!  Such a simple pattern and such a beautiful piece of work.


I recently went to my first meeting with my local chapter and it was so neat.  It feels so good to be part of something that is doing such a great work.  I do a lot with my church, but I don't branch out nearly enough. I felt so inspired by these women who are so eager to share their talents, time, and fabric with those in need!  

When they send you a quilt kit, they request that you make another quilt from your own stash... I'll share what I came up with tomorrow so be sure to check back!

Thursday, September 27, 2012

Going Batty for Halloween

Those of you who know me, may know that Halloween has always been at the bottom of my list of holidays...

This year, for some reason, I'm getting in the spirit of things and sewing up a storm!  I think its all the cute ideas out there and then I made the mistake of falling in love with designer fabric...

I found some great Halloween fabric on etsy and the first project I made was this Bat Mobile I found on one of my very favorite sewing sites Sew4Home.com


I have a couple other projects from their Halloween collection that I'm working on and will share soon. You should definitely check out their tutorials no matter what your sewing level is. They have so much (SO MUCH!) great info available!

These bats just make me smile.  Rather than using all different fabrics for each bat, I have the bats with polka dots on one side (from Riley Blake's Costume Clubhouse line) and just plain black (kind of with a water color-esqueness to it) on the back side.

I can hardly wait to decorate for Halloween now!  Aren't they adorable and they were quite easy to make.  The hardest part was sewing up the opening where I stuffed them... luckily I don't think anyone is going to look too closely at them!

Monday, September 24, 2012

Fabric Pumpkins & Faux Embroidery Floss Tutorial

I recently found a tutorial (that I can't for the life of me find again) to make these sweet pumpkins.  She has a pattern for a free download and you can print it in 5 different sizes!  I opted to just make these three since I was using scraps of fabric.  I LOVE how they turned out and how they look on our half wall between our dining room and family room!


The light big one is just some random fabric that I found in a remnants bin.  I've used it in all sorts of projects, from baby #5's quilt to a child's apron and I had just enough to make this cute little pumpkin for my patch.

The smallest pumpkin is left over scraps from the fabric I used to cover a lamp shade in my bedroom. It is one of my all time favorite fabrics (it better be at the price I paid for it!  Thank goodness for 40% off coupons!).

And the dark bigger one is actually a napkin I found at Pier 1 several years ago.  I love it!  And I think it makes the perfect fall (and even Halloween) decoration with the sparse trees and the birds!

Faux Embroidery Floss Tutorial
I embroidered the leaves with a light colored thread... I don't have DMC floss hanging around my house, so in an effort to mimic the effect I:

  1. Cut a LONG piece of thread
  2. Fold it in half
  3. Put either the two ends or the folded end through my needle (I found with my small eyed needle it was easier to do the two ends)
  4. Fold it in half again, so the two ends and the folded end are together
  5. Make your knot and begin sewing!
I have a great, unique way of making a knot that almost always results in a perfect knot at the end of the thread with no leftovers hanging out... I'll do a tut for that soon.

Making the Pumpkins
I'm going to keep looking for the tutorial I followed so I can link it here and you can use her pattern... but until then if you just can't wait to make one yourself you basically just cut a leaf shape or a really narrow eye shape.  Think, an oval with points on either end.  

Layer your fabric as thick as your scissors will allow... you need 7 shapes cut out altogether.

Sew them together point to point, like your making a beach ball until they are all together being sure to leave a 1 1/2" opening in the last seam.

Fill the bottom portion of the pumpkin with rice and then stuff the remainder with polyester fiberfill (or stuffing of your choice).

Hand stitch the opening closed.

Using the Faux Embroidery floss technique above wrap the thread around the pumpkins natural indents to accent the pumpkin-y goodness.  This part of the her tutorial was a little difficult for me to understand, but what I did was tie a knot at the top and the bottom of the pumpkin and pulled somewhat tightly.

Add a small circle to the bottom of the pumpkin (two circles sewn together then turned right side out through a snip in the bottom of the two). She suggests hand stitching them, but I used fabric glue.

Then make the stem and the leaves.  Hand stitch them on.  Stand back and admire your handy work!

Thursday, September 20, 2012

Apothecary Jars

I made these adorable jars last year for the craft booth I did before Christmas.  I didn't sell as many as I made, so I have them all over my house.  I recently went on a little shopping spree for some fall fillers and ribbon and I love the way they greet me as I enter my front door!


Decorating for fall is one of my favorites!  I have lots of fun things to share in the upcoming days and weeks!

Saturday, April 14, 2012

Defining Your Style

So, the second challenge for the FFA was to take a style quiz at homegoods.com.  Here are the results from my quiz, with my thoughts sprinkled throughout.  You can take the quiz here.

Kim, You Are An EARTHY CASUAL

You're interested in creating a welcoming home where people feel comfortable and happiness flourishes. You appreciate the warmth and individuality of natural materials and handcrafted things and are inspired by colors and forms from nature. You love mixing up different textures and are sensitive to the tactile qualities of objects. Your style is grounded and solid, not flighty or frilly. And you are never taken in by the trend of the moment.
You value comfort. Your home is a warm and open friendly place, and you feel happiest when everyone is cared for and relaxed in your space. Elements like pillows, throws, overstuffed furniture, and good lighting set the mood. You may also enjoy layering different fabrics or mixing patterns to create a cozy effect.

If you check back to what I wrote about how I wanted my home to feel, you can see that this quiz really hit the nail on the head!  Honestly, I never thought I had a "style."  I mean, comfortable and happy hardly seem like styles, but I think maybe, just maybe, I DO have  style!  yay!

And then, as if that wasn't fun enough... they threw in some great tips that also seem to fit my style/life quite well.

With your style and needs in mind, here are a few tips that will help you make your home a little happier.
1. Your Design Challenge: ORGANIZE  The front hall sets the mood for your entire home. Consider how to accommodate all the room's functions as beautifully as possible. At the very least you need a console, and if you're short on storage, consider a dresser. Outfit the surface with nice trays and bowls for mail, keys and sunglasses. Keep a trash can for immediately tossing the junk mail. Closet-door or wall hooks encourage coat and bag hanging rather than dumping. If you have children, try to give each a basket in the closet for hats and gloves. It's nice to have a chair or bench for changing shoes, a mirror for last-minute lipstick checks, and a lamp or sconces for warm light.
Seriously, I laughed at the "if you have kids" line... we do have a hook thing for hanging backpacks and jackets, but it just looks terrible!  Maybe I'll figure this out in the next life (or house?). :)


2. Your Happy PlaceMake this room as comfortable and inviting as possible by bringing in some real furniture like an armchair or a sofa if you have the space. A little lamp on the counter or decorative hanging light can set the mood. Stools are great perches and can easily be moved around. Don't forget to bring your personality and style into this room: hang some art or display a collection of family photos in mixed frames. Consider bold, happy colors in the kitchen as well, like brightly colored pots and pans, big bowls for corralling fruits and vegetables, and trays for spices, oils, teas and pepper mills.
3. Be Party-Ready All the Time!Food: Devote space in your pantry or on a shelf for go-to party essentials: crackers, dip, chips, nuts—whatever you like to serve. Keep on hand a collection of attractive bowls and cocktail napkins, and you'll be able to set a spread—instantly!

Drink: The simplest and chicest thing is to have a drinks tray or table always set up. Include a mix of pretty glasses, an ice bucket, a lovely pitcher, and bottles of soda and water. When the bell rings, just add ice and limes.

Mood: Nice, flattering light makes us feel good. So nix the harsh, direct light from overhead fixtures in favor of the softer glow from floor and table lamps. Also, keep some votive candles and a couple of hurricane lanterns for setting around the room.

Scent: The first thing you notice about a home is how it smells. Use naturally fragrant cleaning products. If you find a scented candle or fresh potpourri you love, stock up on it. Any scent you like, whether perfume or linen spray, can be used on upholstery, bedding or just spritzed into the air.


The only thing that didn't really scream my name was the Happy Home Colors.  I do love these colors, and I do use them in my home... as accents.  My favorite chair totally a gold, crushed velvet chair I picked up at Goodwill.  And my room has orange accents like pillows and lampshade and art.  And I guess, my entry is painted a nice golden wheat color... but still!  If you ask me, there needs to be some green in my Happy Home Colors.  Nothing makes me happier than using green in my decor.  But, I guess the name of my "style" suggests that green fits well, since it is "earthy" and all. :)


Your Happy Home Colors
Yellow
Putting Color to Use!
Don't forget that color looks best when paired with some neutrals for a little visual relief. If you go wild on the walls or with your upholstery, pull back a little on the rugs or curtains or vice versa. Each room can definitely have its own color palette, but think of your home as a whole, with each room transitioning to the next. Some tricks: go for fairly neutral hues in hallways, or add some colors from one room into the neighboring room, even in the form of accessories or fabrics.

Tuesday, March 27, 2012

Fearlessly Finding Awesome

Do you have blogs that you just adore, even though you don't actually know the person who writes it?  Well, Vintage Revivals is one such blog for me.  Mandi is one of the coolest people I don't know. :)  So honest, so brave, super funny, and so flippin' creative its insane!  Well, she has started a club called FFA (Fearlessly Finding Awesome) and she's just so great that who wouldn't want to be in a club with her?

So for the first challenge of said club Mandi has issued the Catch A Dream challenge.  To write about my personality traits, what I like about myself, what I want my home to feel like... so here goes.

I am an outgoing person, I love to meet new people and take on new adventures.  I really like being active, outside, in the beauty of the earth.  That being said, I also really love to sit down and read a book or watch TV with my hubby.  I think people matter most to me.

The feeling I hope others feel when in my home is comfort.  I'd like my home to be a happy place where my family and friends can relax and enjoy time together.  I'd like for my house to be the cool house where my kids will bring their friends to hang out.  Comfy, relaxing, happy.


Vintage Revivals

Tuesday, January 3, 2012

Ric-Rac Rosette Earrings

I've been wanting to try making these adorable little rosettes for awhile, and finally did it today!  I can't remember where I saw this idea, but I'm sure its all over the blogosphere.  Here is my take on making ric-rac rosettes and using them for earrings.

What you will need:
  • About 20 minutes
  • Some ric-rac (I think I had about 20 inches, so 10 inches per rosette)
  • Quick drying fabric glue
  • Earings (I am using an old pair of earrings that I haven't worn since high school!)
  • E6000 glue (pictured further down the post)
The best part of this for me... I had it all on hand so this project was FREE!!!


Start out by putting some of the fabric glue across about 2 inches of the ric-rac.

Then start rolling.  Continue putting glue on the ric-rac and rolling...

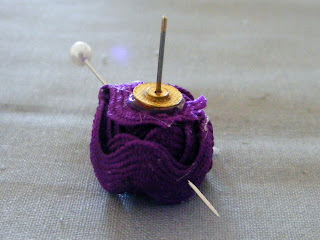
When you get the rosette to the size you want, put some glue across the bottom of the rosette, then fold the ric-rac straight down and across the bottom.  You can see its folded/pinched a little under my finger, I put a small dab of glue there too, to hold it in place.

 Snip the ric-rac so its covering the bottom of the rosette, but not hanging out, you don't want to see it from the top side.  Then stick a pin through the whole thing to hold in place while the glue continues to dry.

No put a small dab of E6000 on your earring and smush it into the bottom of the rosette.

Let dry.  Remove the pin.

And enjoy your fun, new, fashionable earrings!

Linking up to....

Monday, January 2, 2012

Using the Silhouette on Contact Paper

I got a silhouette for my birthday this year and I was so super excited!  However, after playing with it a tiny bit I got kind of intimidated and discouraged.  I was unable to view the instructional video so I had to figure it out on my own.  

So, as time went by and I read little bits about tricks of the trade I decided to pull it out and try my hand at some cuts.  I did a card first (I'll share it later) and it boosted my confidence and excitement.  I was finally ready to try my hand at a project I'd been wanting to do since before I even got my Silhouette!

Now, first let me tell you that I don't have the Silhouette vinyl.  I wish I did, but I don't.  What I DO have is a big roll of white contact paper that I purchased by mistake (thinking it was clear... I'd never bought contact paper before, give me a break:)  I wanted to see if I could use contact paper to make my cuts.  I'll tell you how it went as I go along. 


The project: my bathroom wall.  We recently redid our bathroom, we have this ugly medicine cabinet built into the wall and it needed something to make it a feature rather than an eyesore.  I decided it would be cool to paint it the same color as the wall and have some design go from wall to cabinet door as one solid piece.  I think my vision was executed pretty well.  Every time I go in there, I smile at my lovely wall.

Now, if any of you are interested in knowing the nitty-gritty details of the process, read on.  

My Design Plan:  Using a single shape from the Silhouette I created this motif to run across my bathroom wall.  This picture shows that I cut the shape 5 times,  two of the cuts were larger than the others.  If its labeled with an "A" it was part of the "A" branch (how clever I was to come up with such a system!).  So, if you look closely, you can see that I ended up cutting and "pasting" (if you will) the branches into a design that fit the space and worked for me.  Specifically the "E" branch was divided into sections.

I was able to wrap the contact paper up over the edges of the cabinet and then to make it work over the door I simply snipped the paper with some scissors and attached it with almost seamless results!


Cutting Contact Paper with the Silhouette:  I should first say that I don't know if using contact paper is bad for the machine.  My gut tells me its fine, since it cuts vinyl and a wide variety of other materials.

I did use the backer board to run it through the Silhouette.  First run through, I used the lightly sticky backer, the machine totally ate up the contact paper.  Some areas it pulled the paper away from the backer, other areas didn't get cut through at all.  Second run through I used the heavier stickiness backer, it worked much, much  better.  Though it still didn't cut through every spot, I was able to salvage most of the cuts (with sharp scissors) to create the look I was going for.

Edited to add~ I first started writing this when I completed this project in August of 2011.  Now that its January 2012 I'm finally getting around to posting it and I've got some more to add.

I did not use any kind of transfer paper either.  Knowing better now, I don't know if I'll ever do it again!  That transfer paper is awesome!  But I was able to make it work and I'm all about saving money.

You may be wondering how the contact paper has held up over the 4+ months its been on the wall... it still looks great!  When I first put the motif on the wall I would go in and just admire my work, I'm not making special trips to go fawn over it now, but I do smile every time I look at it.

If you have a Silhouette and are nervous about trying it out... just start playing with it and trying new things.  You may not have perfection, but you'll gain confidence and learn to love that little machine and the many amazing things it can do! And be sure to check out the silhouette blog for some great tips and tutorials.